Sunday, August 17, 2014

20% Off Best MTS/MXF/MOV Converter at 2014 Back-to-School Special Offer

Now it's almost time to back to school, have enjoyed a color and meaningful Summer break? Let's get ready and be excited for another great term! Meanwhile, after a long summer holiday, are you looking forwared to see everyone and prepare some cool gifts for your classmates or teachers?


Welcome to the Pavtube 2014 Back to School Promotion Center where Up to AMAZING 35% OFF Back to School Specials are waiting for you. You be surely be entertained at your free time.
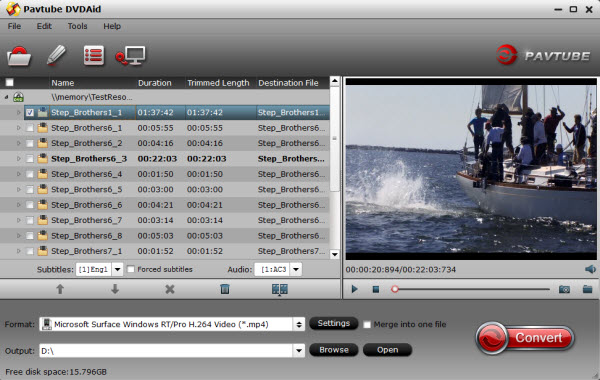
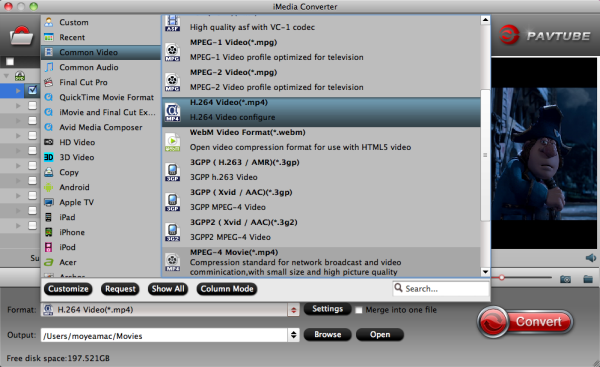
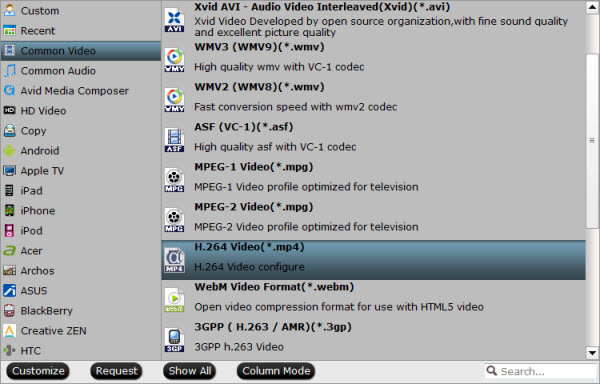
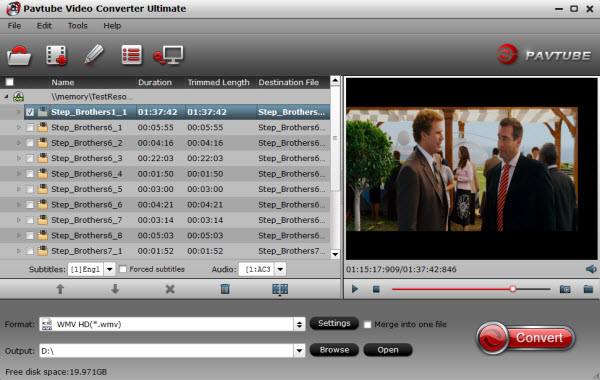
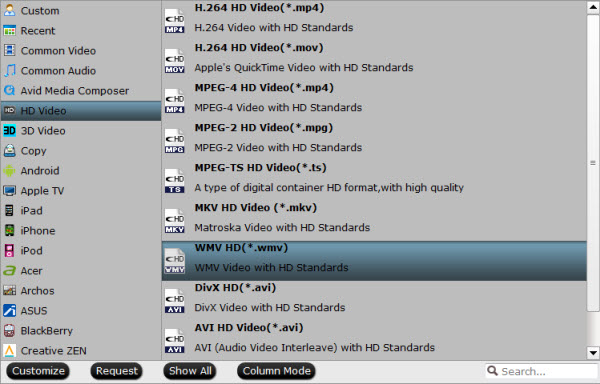
The giveaway includes Blu-raysDVDs and HD Videos related software which will give you great experience when enjoying these videos and movies on Android/Apple/Windows devices. Besides that, you will have no worry about any compatibility issues when editing the MTS/MOV/MXF files in Mac editors(FCP, FCE, iMovie, Avid Media Composer, Adobe Premiere, etc.), and Windows editing programs (Sony Vegas, Premiere Pro, Movie Maker, etc.)!

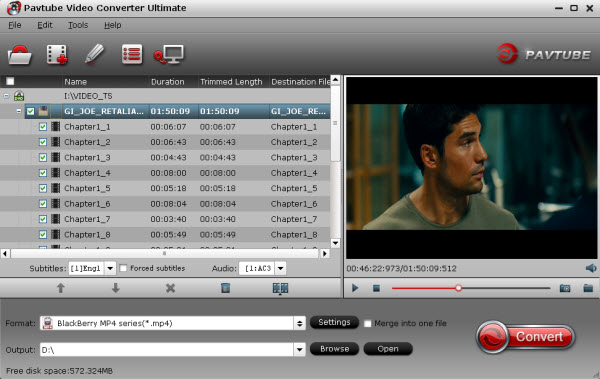
Hurry to get- 20% OFF Video Converter now!

Best video converter and editor to handle SD and HD videos, Tivo and DVR recordings for free enjoyment and free importing to professional editing programs.


TERMS & CONDITIONS APPLIED:

The deal is valid from 15th Aug to 15th Sep, 2014


More details are here:


http://www.multipelife.com/back-to-school-specials-2014

From: http://pc-mac-compatibility-issues.blogspot.com/2014/08/2014-back-to-school-special-offer.html

Tuesday, August 12, 2014

Insert DVD movies into PowerPoint with MPEG-1 mpg format

“I’m a student from University and Majoring in film. Now, I just need to present a DVD in PowerPoint slide, which may make presentation much more entertaining and informative. But I'm fail. Any suggestionsor hlpe me? ” This is a simple question asked frequently in yahoo answers. Now I'd like to show my opinions so as to solve this problem. 

To embed a part of DVD in PowerPoint means inserting a DVD clip physically into an application so that it can play within the presentation. In most cases, embedding DVD in PowerPoint will end in failure. Microsoft PowerPoint supports many kinds of video file formats, such as WMV, ASF, AVI, and MPG. However, it does not support DVD VOB file.
  
There are 2 parts to finish your task. One is to convert DVD movie to video(as MPEG-1 mpg format), the other is to insert the converted video to PowerPoint. 

Part one: Convert DVD to PowerPoint supported video format (as MPEG-1 mpg format). 

To convert DVD movies to PowerPoint friendly AVI, MPEG, WMV, etc videos, you can use Pavtube DVDAid. It lets you rip DVD to all popular video formats and even extract audio from DVD movies. Besides, the built-in video editor allows you to trim, add watermarks, etc. to get the very part and effect you want. Now, just get the right version and follow the guide below to convert DVD to PowerPoint supported video formats and insert videos to PowerPoint presentation. 
  
Step 1. Download it, Insert the DVD disc into the DVD drive, open the program and import the DVD files. You can select the subtitle language as you want. 

dvd to powerpoint

Step 2. Click Format bar and choose your desired format. To embed DVD to PowerPoint, you can choose “MPEG-1 Video (*mpg)” format from Common Video profile list. 

dvd to powerpoint

Tips: 
Microsoft PowerPoint supports the following video formats:

ASF, ASX, WPL, WM, WMX, WMD, WMZ, AVI, DVR-MS, MPEG, MPG, MPE, M1V, MP2, MPV2, MP2V, MPA, WMV, WVX

With Pavtube DVDAid, you can choose the output formats: AVI, MPG, and WMV as the source for PowerPoint. 

Step 3. Select the chapter or title which contains the segment you want, and click the "Customize" button to trim the video with the exact duration under the "Trim" tab. 
 
dvd to powerpoint

Step 4. Back to the main interface, and hit the big “Convert” button on the bottom right corner to start the conversion. You can do some housework during the conversion.

Part two: Insert your converted video to PowerPoint 

Open your PowerPoint presentation and click "Insert". For PowerPoint 2013, click the Video drop-down arrow, then select Video on My PC. Locate and select the desired video file, then click Insert. For PowerPoint 2007, choose Movie and select the video clips. For PowerPoint 2003, select "Movie and Sounds" > "Movie from File" to choose the video clips. 

Okay, If you want your DVDs to play automatically when you advance to this slide, you can stop here, and then happily enjoy your video at your will via PowerPoint. 

More Releated Articles: 

Convert Recording from GoToMeeting to MP4 format
Play YouTube video in PowerPoint without internet
Archive my blu rays and DVDs for watching
Encode DVD to MP4/M4V for NAS Hard drive

Wednesday, August 6, 2014

Review: Top 5 Apple/Android DVD Ripper for Windows and Mac Users

If you and family members are all movie fans, you may have lots of DVD discs are filled in your home. Have you ever worried about these DVDs whether going to last forever?Are you wanna rip these wonderful DVDs to your portable device? Are you looking for an easy-to-use, quickly, friendly and top DVD Ripper program? This guide aims to help you choose the best Apple/Android DVD Ripper for Windows and Mac Users. Here, we pick up the most popular and practical DVD rippers and give a review of Best 5 DVD Ripper for encode DVDs to your all Apple or Android devices.
  
top dvd ripper

DVD Ripping Software: Why It Is Necessary:
   
A. For Android and iOS mobile users, one of the most dangerous things is watching online videos, not only because they are planted with ads, but also for the possibility that there are some extra compulsory charging and potential threats to PCs. Accordingly, to play movies offline and sort out DVD collection, some people may be seeking for the best free DVD rippers for Windows or Mac, but only end up with the functional limitation such as in the DVD to AVI ripping and the support for region/copy protected DVDs.

B. The DVDs still have a limited shelf life and you could potentially lose the data on the disc due to a large number of circumstances. If the disc doesn't go bad naturally, it could potentially become scratched and large portions or even the entire disc could be rendered unplayable. To keep them all the time, we can choose a software and then play them on your all devices (just like iphone5S, Samsung S5, Kindle Fire KDX, Surface pro 3, etc) for watching on the go. 
    
According to industrial surveys, online response, user feedbacks and ownership recently, Pavtube DVDAid shall be crowned the top 1 commercial DVD ripper brand for Windows or Mac. Let's see the following review:
  
Top 1. Pavtube DVDAid (Win/Mac
 
top dvd ripper
 
Pavtube DVDAid is regarded as the best DVD ripping software on the market that provides movie lovers, children and people in any group with the easiest and fastest way to rip and convert DVD movies to MP4/AVI/MKV/WMV and many other video and audio formats with high quality. It lets you enjoy DVD movies on any portable device like iPhone 5S, 5C, iPad Air, 2nd Gen Nexus 7, Asus Fonepad 7,Sony Xperia Z2, Surface 2, Surface Pro 2 and Surface RT/Pro, Kindle Fire HDX, etc. 

Moreover, Pavtube DVDAid makes 1:1 copy of original DVD Disc without quality loss with all audio streams, subtitle tracks, extras, etc. For the short time it takes to convert the movie with the help of CUDA/AMD GPU acceleration, and you will get hours of enjoyments. It's simple to use and well worth the investment. 

The best feature: It can support latest DVD, features with adding *.srt and *.ass subtitle, also help you direct copy titles from DVDs.
  
If you travel a lot and you are looking for a way to take DVD movies you purchased with you to enjoy all the movies in your library, or you just want to backup your DVD collection to avoid them from daily playback damage or from your children, Pavtube DVDAid is the best choice. (A step-by-step guide refer to: Rip DVD movies to Android Phone/Tablet for watching freely. 
  
Top 2. DVDfab DVD Ripper (Win/Mac)

top dvd ripper

DVDfab has a comfortable blue interface, but it is not user-intuitive as Pavtube when it comes to operation. DVDfab DVD Ripper is good for those who would like to have external subtitles and 2 audio languages (MKV only), or those who want to rip a DVD to iPad MP4 and MKV at one time- this app queues up your conversion tasks and it pops up settings/queue box each time a chapter is selected (this makes the operation kind of misleading). There’re some presets for Android smartphones and tablets, and you’re allowed to custom your own format to utilize the screen of your tab. Overall, DVDfab is a nice choice for ripping DVD to MP4/MKV with multi-streams.
  
Top 3. Magic DVD Ripper (Win/Mac) 

top dvd ripper

Magic DVD Ripper detects and imports DVD from optical drive automatically. If you have a DVD backup on hard drive, you can select and load the VIDEO_TS folder instead. Magic features adequate common video formats (MP4, AVI, WMV) for average users, but 32 presets are not sufficient for Android users, since there’s only 1 format for Android tablet – the Kindle Fire. As Galaxy Tab owner I would like to put DVD movies onto the 10.1' tablet and I need a costumed format to ensure smooth playback on my device. Magic DVD Ripper failed to keep the original aspect ratio, and gave softer image. Magic DVD Ripper serves as a nice tool for copying and burning DVDs though.

Top 4. AnyDVD (Win/Mac)
 
top dvd ripper
 
AnyDVD (which rips DVDs only) and AnyDVD HD (which supports Blu-rays and HD DVDs) both earned high praise from you for being well worth their entry prices, and getting frequent updates to get around the copy protection that disc publishers include that make it harder for you to rip your own movies and play them on the devices you choose. The app can handle unwanted DRM, remove region restrictions, disables forced subtitles or delays, and even plays nice with DVD authoring tools if you're backing up your movies. You can try the app for free, but its features will cost you: AnyDVD is 49EUR ($65 USD) and AnyDVD HD is 79EUR ($105 USD).

Top 5. Aiseesoft DVD Ripper(Win/Mac)

top dvd ripper

Still not sure how to pronounce, but it does just what it says; it rips DVDs. It’s not as robust as the Toast or DVDFab products, but it works well, it’s fast, users seem to like it and it has a great price point. It even offers some basic editing functionality and a whole host of different file format/container options. Therefore it’s worthy of being in the top 5. 

Free Options: 

Here, we will give you a surprise is that Pavtube Free DVDAid, Top 5 Free DVD Rippers Review: Full Guide. It offers you a fun, easy and fabulous way to rip DVDs, according to Pavtube, this freeware has all the features of regular DVDAid except it cannot output as MP4 nor does it have specific output profiles for electronic devices. 

Conclusion:

Pavtube DVDAid is proved to be the best DVD ripper for Android tablet/phone. It ranks top on the DVD ripping application list for almost every aspect except for interface design.

Anyhow, hope this top 5 DVD Ripper Reviews can help you fast choose an easy-to-use and yet professional DVD ripping tool. Now get the best DVD Ripper Program for You!

Wednesday, July 30, 2014

Two Methods: Backup Blu-ray and DVD on Your Computer

As we all know, Blu-ray/DVD discs are very expensive (especially Blu-ray disc), mainly because of its strong support for capacity storage and high-definition video. Therefore, if our Blu-ray/DVD discs cannot be played properly caused by the child's carelessness, wet weather, playback times or over-long storage time, etc., it would be very regrettable thing. 
 
backup blu-ray/dvd on pc

So, in order to avoid such regret, the most sensible way is to do a disc backup. The top Blu-ray/DVD Backup tool has become increasingly common due to mature technology and low price, it will become one of the most common backup method. In this case, we need a third-party software to avoid damage to expensive and fragile Blu-ray/DVD disc. 
  
Which software can help backup Blu-ray/DVD discs? 
     
Is there any reliable tool which can help the owners of Blu-ray/DVD discs conquer these technologies, and cope with all encryption means in the future? Here, we suggested you Pavtube BDMagic, a powerful Blu-ray Disc handling tool integrating disc backing up(ripping) and transcoding functions. For backing up, it can make a 1:1 copy of BD movies to your computer with all subtitles, audio streams and chapter information included, as well as directly copy BD main movie without extras. Moreover, it can re-encode Blu-ray movies to HD and SD video in over 50 file formats including H.264/MPEG-4, DivX, XviD, MKV, MP4, AVI, MPEG, WMV, FLV, SWF, F4V, MOV, 3GP, etc. 
  
Note: If you are Mac users, you can Download the Pavtube BDMagic for Mac.
  
Method 1: “Full Disc Copy” maintaining original structure without loss
  
1.Install and launch the Blu-ray/DVD Copying software. Click “Load file(s)” to load original Blu-ray/DVD discs. You need a Blu-ray Disc drive (either external or internal) to read Blu-ray Disc. 

backup blu-ray/dvd on pc

2.Click the quick button "Copy the entire disc" to start copying Blu-ray with original structure. 
 
backup blu-ray/dvd on pc
    
As soon as the copying task finished, you can click "Open" button to locate the Blu-ray directory. The decrypted Blu-ray folder contains all information and contents in the original disc. Among them, the BDMV folder is the most important one with audio and video files in it. Open BDMV -> STREAM folder and you will find all the .m2ts movie clips.  
   
Method 2: Directly Copy only Blu-ray/DVD Main Movie and Leave Out Extras
    
Step 1. Load Blu-ray/DVD movies.
  
Insert Blu-ray or DVD Disc with the Blu-ray drive. Launch the Pavtube BDMagic and click "Load Disc" button to import Blu-ray/DVD movies.

backup blu-ray/dvd on pc

Step 2. Choose Directly Copy Blu-ray/DVD discs.
  
Click "Format" bar, choose "Copy" > "Directly Copy" from the Format menu and then specify a folder to save the M2TS/VOB files from Blu-ray/DVD discs.    
Step 3. Start Blu-ray/DVD backup on Computer. 
  
Hit "Convert" button to start copying M2TS/VOB streams from your Blu-ray/DVD Discs to hard drive. When the copying work is done, you are able to click "Open" button to get the output .m2ts or .vob files without any other extra structures or contents. 
    
You're done! Now you may got known how to backup, copy Blu-ray or DVD discs on computer when you wanna keep your Blu-ray/DVD discs from scratching, or manage movies in a more convenient way. 

Related Articles:

Backup Blu-ray/DVD movies to NAS and play on HTPC

Friday, July 18, 2014

Recover Deleted Video &Photo from iPhone 4S

Deleted some important photo& videos on iPhone 4s camera by mistake, don’t worry, you still have chance to recover them back.

I deleted photos from my iPhone 4S by mistake, they are very important! Is there any way to get it back? Your help will be fully appreciated. Thanks!


In fact, It’s impossible to recover deleted photos/video directly from iPhone 4s, but if you have backup your iPhone 4s to computer before deleting photo, you can easily retrieve the deleted photos from backup with the help of iFonebox, you have no need to restore the whole backup, it’s a waste of time and may cause data loss again.


iFonebox is professional iPhone 4S photo recovery tool which can help you recover iPhone 4S photo easily. Only a few steps, you can find out the deleted photo on your iPhone 4s and extract them from backup files with no data loss or personal info leaking. You are allowed to preview the contents of the photos&video and selectively recover them from iPhone 4s backup. Only a few steps you can quickly get back the deleted photos.

Download the free trial version of iFonebox (Windows & Mac) by clicking below icons and have a try. Both of them support iPhone 5S/5/5C/4S/4/3GS, iPad air/ mini/ mini2, iPad3/2/1 etc.

Tutorials: How to retrieve deleted Photo from iPhone 4s camera roll


Here we take ifonebox for Mac as an example, if you are windows computer user, please taken similar steps below.

Step 1: Choose a recovery mode

Running this iPhone 4s photo recovery on your computer, Choose “Recover from iTunes Backup”, the software will detect backup files automatically.


Step 2: Select an iTunes backup file to scan

All your iTunes backup files of your iPad, iPhone or iPod touch which has ever synced with iTunes on this computer will be automatically found and listed here. Select the right one for your iPhone 4s and click “Start Scan” button.


Step 3: Preview and recover photos from iPhone 4s backup

After scanning finished, you can see a categories on the top side of the windows include camera roll, photo stream, contacts, messages, etc. Click the “camera roll” or “Photo stream” icon, all deleted and existing photos and videos displayed here, preview the photos one by one and selectively mark those you want, then click “Recover” button to save them on your computer as readable file.


That’s all! So easy~

You successful get back the deleted photos. Don’t hesitate to download it to have a try. With iFonebox, you can also directly scan you iPhone/iPad to recover deleted Notes, Messages, Contacts, Call history even of you have no backup.

Thursday, July 17, 2014

Import/Edit MKV, AVI, VOB, Tivo, MPG in Final Cut Pro 6/7 on Mac OS X

Let's find out how to import and edit MKV, AVI, VOB, Tivo, MPG video files in Final Cut Pro 6/7 on Mac (Mavericks and Yosemite included), here we can easily fix it.

As a professional non-linear editing software application, Final Cut Pro is the first choice of professional editors. Whether you're working solo or collaborating with a team, Final Cut Pro gives you more creative options and technical control.


Though Final Cut Pro 6/7 is able to import and edit any QuickTime compatible video format, camera-native formats, even Apple ProRes, there is still limitation in importing MKV, AVI, VOB, Tivo, MPG to FCP 6/7, let alone to edit those kind of video formats. This following will introduce a step by step guide on how to successfully import video to Final Cut Pro 6/7 no matter what format the video is.

To start, make sure an application for video converting installed on your Mac. If you are looking for ease of use, and don’t mind spending $52, check out Pavtube’s iMedia Converter for Mac. Specially designed for Mac users, mainly video hobbyists and independent filmmakers, the Mac Video to FCP ProRes Transcoder is able to convert MKV, AVI, VOB, Tivo, MPG to FCP natively Apple ProRes Codec for editing.

Tricks for Importing/Editing MKV, AVI, VOB, Tivo, MPG files in Final Cut Pro 6/7

1. Load video files to the program

Go to the folder where you have saved the MKV, AVI, VOB, Tivo, MPG videos, and then directly drag and drop the video files to the program dock. The files will be imported to the application automatically.

Note: If you have several video clips on your Mac and you want to combine them and export a continuous video that Final Cut Pro supports, just check "Merge into one file" at the bottom of the program.


2. Click on “Format” bar and follow “Final Cut Pro” template to set a FCP 6/7 friendly format.
For HD 1080p video files, you are advised to Follow “Final Cut Pro” template and “Apple ProRes 422 (*.mov)” format.


Tip: If you prefer smaller file size, choose “Apple ProRes 422 (LT) (*.mov)” instead. The “Apple ProRes 422 (Proxy) (*.mov)” format offers file size at SD levels and is recommended for 480i/p and 576i/p shootings. The “Apple ProRes 4444(*.mov)” creates videos in lossless quality at huge file size, and is not recommended for home video making.

3. Start Video to FCP conversion on Mac OS X

Click "Convert" button, and this smart Video to Prores Converter will do the rest for you! When the conversion is done, you can import the output prores .mov files to FCP 6/7 without any trouble. Congratulations! You have successfully taken the first step to make your own masterpiece. Have a try now!

Read more:

How to Download DVD Movies Into iTunes
The way Adding multiple WMV video files to iTunes Library on Mac
First product supports editing Blu-ray/DVD movies in FCP X retaining surround sound track

Thursday, July 10, 2014

Save phone number in your iPhone 5 when its screen is died

iFonebox is a useful iPhone 5 Contacts extractor for iPhone 4 users to recover their lost Contacts, even when the screen is black or died.

recover contacts in iphone 5

Q: “Something wrong with my iPhone 5’s screen.The screen become black, but it is strange that I could receive calls from my friends. So the problem may be the iPhone is ok, just the screen died. What I need is to preview my Contacts in the iPhone. Can any one help me?”

A: You could use iFonebox, the professional iPhone 5 contacts extractor to rescue your phone number.

The most fragile part of iPhone 5 may be its screen. Many iPhone 5 users post in the forum and said that their screen are easily broken or become black. In this case, if you also want to recover your Contacts in your iPhone 5 like above customer, please read on and you will find the best solution.

First, free download the trail version of iFonebox on your computer, we will take the Windows version as an example, If you are a Mac user, just download the Mac version, the recovery step is similar. Here we also give 30% off for 2014 Summer Holiday!

Now, let’s start it.

How to Rescue and recover Contacts in iPhone 5
 
Step 1: Choose Recovery Mode

Install iFonebox on your computer and run it, connect your iPhone 5 with your computer, then you will see the interface as follows, just choose “Recover from ios device” as the recovery mode.

iFonebox Review: Easy way to get back lost data in your iOS Mobile

recover from ios device

Step 2: Start scanning iPhone 5

Then the professional iPhone 5 contacts extractor will automatically begin to scan and analysis your iPhone 5, the scanning time will depends on the database in your iPhone, which means more data in your iPhone 5 will takes more time to finish the scanning. Just wait patiently.

recover from device scanning

Step 3: Preview and Recover Contacts in iPhone 5

When the scanning is finished, all the data in your iPhone 5 will be displayed in the interface of iFonebox. Click “Contacts” and you could preview all the phone number in your iPhone 5, including these you once deleted. Click the “Recover” button on the top right of the interface to restore them on your computer.

recover contacts from idevice

Saturday, July 5, 2014

How to Play and Watch DVD Movies on Windows 8.1/8 Tablet

This article introduces a review of the best DVD ripper for Windows 8.1/8 Tablet and tells you how to rip and convert DVD to Surface RT, Surface Pro, Surface 2, Surface Pro 2, Surface Pro 3 ...

Windows 8.1 is here just a year after Windows 8. This update—free to existing Windows 8 users- doesn't fundamentally alter any of the objectives or design goals of Windows 8. Microsoft still wants to have one operating system that can span tablet and PC- and, if one looks further into the future, perhaps even the smartphone, too.


Windows 8/8.1 Tablet, such as Surace RT, Surace Pro, Surface 2, Surace Pro 2, Surface Pro 3, etc. are the market hot spots. They are all perfect for watching videos on the go. However, Windows device don't have the DVD drive for playing DVD movies. That means, if you want to watch DVD movies on your Windows 8/8.1 Tablet anytime and anywhere you like, you will need to rip DVD to its compatible video formats like MP4 at first.

Software Requirement:


Pavtube DVDAid or DVDAid for Mac. Let's have a closer look at the basic steps.

1. Run Pavtube DVD Converter, and click “Load file” button to browse and import DVD movies that you want to convert for viewing on Windows 8/8.1 Tablet (Surface, Asus VivoTab, Windows Phone).


2. Highlight the movie title you want to rip, and then you can click the dropdown menu after “Subtitles” and “Audio” respectively to select your wanted subs and audio track to be preserved in the resulted MP4 files.

3. Choose "Microsoft Surface Windows RT/Pro H.264 (*.mp4) Video" as target format from “Windows” pull down format presets. Or you can select other Windows 8/8.1 Tablets profile. Just search the device by enter "surface" in the search box and find the profile.


4. Click "Settings" button to configure file quality for Windows 8/8.1 Tablet. After entering “Profile Settings” panel, you are allowed to adjust video and audio parameters such as bit rate, frame rate, sample rate and more.


Note: If you prefer a much better video quality and don’t mind the output file size, you can rise the video bit rate higher. Generally speaking, the higher video bit rate will result in the larger output file size, and vice versa.

5. Click "Convert" button to start DVD to Windows 8/8.1 Tablet Conversion.

As soon as the conversion is done, you can click “Open” button to get the generated MP4 files and transfer them to your Windows 8/8.1 Tablet for playback with ease.

You can follow the easy steps to transfer converted videos to Windows 8.1/8 Tablet:

1.Copy files onto a USB flash drive or memory card on your other computer.
2. Insert the USB flash drive or memory card into Windows 8/8.1 Tablet.
3.Tap or click the notification that appears in the upper-right corner of the screen.
4.Tap or click Open folder to view files.
5.Select the files or folders you want to add to surface, tap or click Home, and then tap or click Copy to.
6.Select a location. For example, choose Documents if the flash drive or memory card contains documents

Learn more:

Backup all of my movies on Windows 8.1 Pro tablet
Play your Blu-ray/DVD movies in any media player
Encode Blu-ray movies on Windows 8.1/8 Tablet/Phones

Thursday, July 3, 2014

2014 Summer Vacation Special Offer- 20% OFF Mac Blu-ray/DVD Multi-track Converter

Woo-hoo, after a long-term study, 2014 Summer Vacation begins! Havn't got any plans? If you are a frequent traveler or ready to prepare a travel this summer holiday by hiking, fishing, camping, or going to seaside with your kids, chances are they'll be clamoring to see some favorite movies when they aren't off at camp or jumping in the pool.


Now with 20% OFF Pavtube ByteCopy for Mac, you can get the holiday more enjoyable! Now just convert your favorite Blu-ray/DVD with multi-track for watching, or make your own summer video freely!

Follow this link to enjoy 49% off and more FREE products~

https://www.facebook.com/pavtubefans/app_186981981345123

Expire on Jul. 15th.

It's never to later to make your choice!

More details here:

http://www.multipelife.com/summer-2014-deals

From: http://movie-tips-review.blogspot.com/2014/07/2014-summer-vacation-discount.html

Wednesday, June 25, 2014

The way Adding multiple WMV video files to iTunes Library on Mac

Do you want to sync WMV Videos to iTunes for transferring to Apple devices? This article mainly introduces the easy solution to add multiple WMV files onto iTunes on Mac.


WMV is a widely-used video format on Windows. But as the typical Windows Media Video format, iTunes currently does not afford WMV files on Mac. So you may always fail whenever trying to sync WMV to iTunes.

To solve this problem, the best answer is to convert WMV to iTunes compatible videos so you can transfer them to your iPhone, iPad, iPod, or stream to Apple TV etc for playback. Now let's go to learn how to do it.

How to convert WMV Videos to iTunes on Mac from syncing to Apple device

Step 1. Run the Pavtube WMV to iTunes Converter for Mac, drag and drop source video to the program.

Tips: If you are Windows users, try Pavtube Video Converter Ultimate.


Step 2. Click on “Format” bar, and Choose iTunes compatible format for Apple devices.

Choose the iTunes supported formats in the "Format" dropdown list. You can go to "Common Video" or "HD Video" options to find what you like. I think H.264 MP4 format is better for iTunes.


But, here you are recommended to choose the Apple devices like iPad, iPone, Apple TV, etc directly. Find a suitable format under these Apple devices options.

Tips: For some advances users, you can go to adjust video and audio parameters like bitrate, resolution, channels, etc. Click "Settings" button you can go to check and change them as you like.

Step 3. Press on “Convert” to start encoding WMV Videos to iTunes compatible video on Mac.

Step 4. When conversion completes, press on “Open” to locate converted videos. Drag and drop these movies to iTunes.

Now open your iTunes and then sync the converted WMV to iTunes library for convenient playback on Apple devices.

Transfer videos to your iTunes library:

Drag a file or folder from the desktop to the iTunes window. If you add a folder, all the files it contains are added to your library.

In iTunes, choose File > Add to Library, locate a file or folder, and click Open.

In this way, you can enjoy your favorite WMV Videos on your iPad/iPhone/iPod wherever you are.

You may also:

Rip/Sync Blu-ray to iTunes with forced subtitles
How to Download DVD Movies Into iTunes
Converting ISO image files to iTunes 11 compatible videos

Friday, June 20, 2014

How to play DVD(ISO) files on home studio via UPnP server

A simplest DVD(ISO) to MP4 ripping tutorial; you can easily backup DVD(ISO) collections and convert them for sharing to home studio via UPnP server.

UPnP (which stands for Universal Plug and Play) is a feature that allows the devices on your home network to discover each other and access certain services. It is a great media server to transfer media to your home computer and stream it directly to your TV. Many users have successfully streamed the videos from internet, like youtube.


However, UPnP only supports FLV, M2TS, MKV, MOV, M4V, MP4, MPG,VOB, WMV .etc media files, Blu-rays and DVDs, like ISO files are disc images not media files and so do not play over UPnP. Then how to backup your DVD DVD(ISO) files on home studio via UPnP server for playback? Well, first of all you need to roll off the DVD disc protection, and then convert them to more common video formats like MP4 which is compatible with most devices, like computer, smartphone, tablet, TV, console, etc.

Hereby you need a DVD ripping software.

Among many tools in various brands, Pavtube DVDAid is definitely hands down better in ease of use, ripping speed and quality of video output. It can reformat DVD(ISO) to the video format that UPnP server supports, like MOV, MP4 .etc with ease.

FYI: Top 5 DVD Ripper Review

Tips: Got the Mac version for you – Pavtube DVDAid for Mac

Download a free trial of this user-friendly Pavtube DVDAid and let's start this super-easy workflow.

Tutorial: How to backup DVD(ISO) to home studio via UPnP server

Step 1. Insert your DVD and launch Pavtube DVDAid.

Insert your disc to computer, launch Pavtube DVDAid and click the disc-like icon on the top, click disc name to load your movie.


Notice the "Subtitles" and "Audio" options above format list? You can choose one subtitle or language and build them into target video. Anyway, if you want to obtain multiple audio tracks or subtitles, try this Pavtube ByteCopy.

Step 2. Choose "H.264 MP4" format.

Click "Format" drop-down list, choose "Common Video>H.264 Video(*.mp4)" as below:

H.264 MP4 is well compatible with main stream devices like PC/Mac, IOS/Android/Windows smartphone&tablet, etc.


(Optional): adjust target file specs.

If you are not satisfied with the default file specs, hit the "Settings" icon (besides "Format") and free change video size, bitrate, frame rate, and audio sample rate, etc.

Step 3. Conversion.

Hit the big red "Convert" in right bottom corner to start ripping DVD to MP4 format directly. Wait for a while when it's ripping; after it completed, hit "Open" or "Open output folder" to quick locate generate MP4 files.

Now just stream them to your UPnP server for sharing and playing with family members!

Read more:

Backup all of my movies on Windows 8.1 Pro tablet
Copy "The Lego Movie(2014)" Blu-ray onto Western Digital My Book Live for roku
Make a copy of Frozen (2013) Blu-ray/DVD for wathing freely

Sunday, June 15, 2014

2014 Father's Day: Take a look at Pavtube Great Gifts your Dad Will Love

Now it’s time to celebrate that all-important guy in your life—dad. Dad is notoriously the toughest family member to shop for. If you've waited until now to pick up this year's Father's Day Gift, then you're going to need a great idea — fast.

Luckily, to celebrate Father's Day with you, Pavtube Studio launch a huge Coupon Code as the 2014 Father's Day Special Offer. Up to 50% off for your beloved dad! Backup your dad's favorite Blu-ray/DVD movie to iOS/Android gadgets, HD TV, home theatre or game console. Even better you can make a father's day video for your beloved dad on your own! It’s more precious than just picking up something on store casually!


Her are Pavtube Great Deals and Specials at Father's Day 2014 weekend

1. 50% OFF Pavtube DVDAid (Win/Mac) as Father's Day Gift 2014

With this professional DVD ripping tool, playing DVD movies on DVD player at home has never been a problem for you. And you can now freely enjoy your favorite DVD movies on the road without worrying about the issues they jump on the most crucial scenes and are prone to scratches.

2. 30% OFF Pavtube Video Converter Ultimate/iMedia Converter for Mac as Father's Day Gift 2014

An all-in-one solution to fast convert Blu-ray/DVD and various videos to virtually any video/audio format for watching on any Android/iOS/Windows devices. Save a 100% intact BD M2TS/ DVD VOB movie without extras.Backup 3D Blu-ray movies to 3D video for watching on 3D devices with pleasant quality.

3. 20% OFF Pavtube ByteCopy (Win/Mac) as Father's Day Gift 2014

An easy to use Blu-ray and DVD movie ripping program is capable of ripping 3D Blu-ray discs, 2D Blu-ray Discs and standard DVDs to required video formats. Most important, it can lossless BD/DVD to MKV backup with multiple audio/subtitle tracks and convert BD/DVD to Multi-track MP4, MOV, AVI for watching on Plex, Roku 3, WDTV Live, Popcorn and more HD media players.

Like our Facbook page to get it Now! Expires on June 21, 2014. Never miss it!

https://www.facebook.com/pavtubefans/posts/761556840555421:0

More money saving bundles can be found here:

http://www.multipelife.com/special-offer

Source: http://comfortable-media-device.over-blog.com/pavtube-fathers-day-sales-and-deals

BlackBerry Z3 supported video formats & best video format - Transfer any Blu-ray DVD and movie to BlackBerry Z3

What is BlackBerry Z3 best supported video format? In this article, you will know BlackBerry Z3 best playback format, and get the best tool to convert Blu-ray, DVD, and videos like MKV, AVI, WMV, MOV, M4V, FLV, etc. to BlackBerry Z3 with best settings. 

The BlackBerry Z3 is an all-touch handset with a 5-inch 540x960 display, dual-core 1.2GHz CPU, 1.5GB RAM, 5MP rear camera and 1.1MP front camera, 8GB of storage and a generous 2500mAh battery. It runs BlackBerry OS 10. Are you an BlackBerry Z3 user? Want to have wonderful multimedia experience on BlackBerry Z3?


Then how to transfer movies into BlackBerry Z3 for watching on the go? As we know, Android OS supported video formats are limited, you will find many movies are not supported, so in order to play movies on BlackBerry Z3 smoothly, you will need know BlackBerry Z3 supported video formats, and convert videos to best video format for BlackBerry Z3.

Supported Formats For BlackBerry Z3

Now check out what formats are supported and can be successfully played with your default video player on BlackBerry Z3.

Image formats:

BMP, JPG, GIF, PNG, TIFF, SGI, SVG, TSG, WBMP

Audio & video formats:

3GP, 3GP2, M4A, M4V, MOV, MP4, MKV, MPEG-4, AVI, ASF, WMV, WMA, MP3, MKA, AAC, AMR, F4V, WAV, AWB, OGG, FLAC

Audio & video encoding/decoding:

H.264, MPEG-3, H.263, AAC-LC, AAC+, eAAC+, AMR-NB, AMR-WB, WMA 9/10, VC-1, VP6, PCM, LPCM, MPEG-2, FLAC, GSM, Vorbis, QCELP, MJPEG

Only format in the supported format list above can by played on BlackBerry Z3. If you want to transfer and play uncognized videos and audios on BlackBerry Z3, the first step you need to do is to convert all unsupported files to compatible format for BlackBerry Z3.

How to convert videos to BlackBerry Z3 best supported video format

To play movies on BlackBerry Z3 and play smoothly, you will need to convert videos to best format for BlackBerry Z3. Here you can go to download and install the best BlackBerry Z3 Ultimate Converter which is recommended to achieve it effortlessly. Easy-to-use workflow, superfast speed with the help of CUDA acceleration, multiple input and output videos with high quality as well as powerful editing function. If you are stilling annoyed about troubles in playing Blu-ray, DVD and MKV, AVI, VOB, Tivo, MPG, WMV, FLV videos with BlackBerry Z3, download this software to wipe it out.

(Mac users go to download Pavtube BlackBerry Z3 Converter for Mac)

The whole operation is just three steps; follow below step-by-step guide to learn how to put Blu-ray, DVD and MKV, AVI, VOB, Tivo, MPG, WMV, FLV to BlackBerry Z3, which also applies to Mac users.

1. Import source files.

Install and run the Pavtube Video Converter Ultimate, click the top left “Load files” to load Blu-ray/DVD from disc drive, folder or ISO/IFO; or load your video files like MKV, AVI, VOB, Tivo, WMV, MTS, MXF, MOV, TOD, MOD, 3GP, FLV, F4V, M4V, etc. by clicking the second icon “Add video”.

Note that your computer needs an external BD drive for loading Blu-ray/DVD movie.


2. Choose BlackBerry Z3 format for output.

MP4/3GP format is the best format for BlackBerry Z3. Click "Format" menu and go through the dropdown list, you are recommended to choose the "BlackBerry MP4 series(*.mp4)" or "BlackBerry 3GP series(*.3gp)" under "Android". It is also fit for BlackBerry Z3.


Or you can choose a profile for general Android devices which is compatible with BlackBerry Z3 as well.


Tips: Click "Settings" button to adjust video and audio parameters like bitrate, size, audio channels, etc to meet your requirement.


3. Convert Blu-ray/DVD movies and Various Videos to to BlackBerry Z3.

Hit the big "Convert" button to start converting any videos for BlackBerry Z3 with the help of technology of CUDA acceleration, you can get 6X faster conversion speed. If you do not remember the location of generated files, click "Open" button to find it quickly.

Now, you have known the best way to convert BD/DVD, Videos to best supported video format for BlackBerry Z3, just download this BlackBerry Z3 movie converter, and import your videos into this program to take a try, hope this tool can help you!

Note:

It is not enough, if you want to edit the video before conversion, it will help to trim, crop, add text/image/video watermark and subtitles and so on. See more detailed information in how to use Pavtube Video Converter Ultimate to convert videos.

Related guides:

Ripping All kinds of Disney Movies to Galaxy Note 3 for playing for my kids
Convert all kinds of video files (MKV, AVI, WMV, MP4, M2TS, VOB) to Lenovo Miix 2 supported format
Supported Video Formats For Samsung Galaxy Note 3, Note 2, Note 10.1

Thursday, June 12, 2014

How to Turn a DVD Into a Video Clip on the Computer


Say you have a movie on DVD, but you want to watch it on your phone, tablet, somewhere else. You can "rip" that DVD—or turn it into a movie file on your computer—to play it wherever you want. Here's how to do it.

Many people may have big original DVD collections of favorite actors and most of these DVDs are copyrighted. To prevent these valued DVDs from any loss or damages, the best way is to keep them well on computer. To preserve your DVD's content, use DVD ripping software to convert the disc to video files. Because Windows doesn’t include DVD ripping software, use a free third-party program such as Freemake Video Converter, HandBrake or Pavtube DVDAid, then use Windows Live Movie Maker to create and edit video clips from your ripped DVD. 


Rip the DVD

Step 1

Download and install a DVD ripping program, such as Freemake Video Converter, HandBrake or Pavtube DVDAid.

Step 2

Insert the DVD into the computer’s disc drive.

Step 3

Launch the DVD ripping software you downloaded, and then follow the program’s instructions to rip the disc to your computer.

Create Video Clip

Step 1

Launch Windows Live Movie Maker.

Step 2

Click the “Add videos and photos” button on the Home toolbar. Select the video you created with the DVD ripping software, and then click “Open” to import the file.

Step 3

Select a start point for the clip by clicking the “Play” button in the Preview window, and then clicking “Pause” when you reach the exact location. Click the “Edit” toolbar tab, and then click the “Start set point” button to mark the beginning of the clip. Alternatively, click and drag the slider bar in the Preview screen to the exact point you want the video clip sequence to start, and then click the “Start set point” button on the "Edit" toolbar.

Step 4

Select an end point for the clip by clicking the “Play” button, and then clicking “Pause” at the exact frame you want to use as the end of the video clip. Click the “Edit” toolbar tab, and then click the “Set end point” button. You can also select an end point for the clip by clicking and dragging the slider bar to your desired video frame in the Preview screen, and then clicking the “Set end point” button on the "Edit" toolbar.

Step 5

Click the “Movie Maker” tab, highlight “Save movie,” and then select the “For computer” option. Enter a file name for the video clip, and then select your preferred destination folder, such as My Videos.

Step 6

Click the “Save” button to save the video clip to your computer.

Tips
Consider transferring the ripped video files to a flash drive for further safekeeping. If your hard drive crashes, you can use the flash drive to transfer the movies to a new computer. Windows Live Movie Maker saves all videos in the WMV format. To save a video clip in an alternative format, such as MP4, AVI or MPEG, install a third-party video editor.

Warnings

Creating backup copies of copyrighted material is considered piracy. Only use DVD ripping software to create copies of movies you created.

References

Freemake: How to Rip DVD Movies Free
HandBrake: Windows GUI Usage Guide
Microsoft Windows: How Do I Trim a Video in Movie Maker?

Resources

Freemake: Free Video Converter
HandBrake: Download
Pavtube DVDAid Onlinehelp

Monday, June 9, 2014

How to Watch Video TS Files

This article mainly discusses convert Video TS files from your DVD disc to play on Windows/Mac without limitation.

The video files on a DVD are encoded using the MPEG 2 format, which can also be played on most computers using multimedia playback software. However, a DVD's file structure requires the MPEG 2 videos to be stored in a very specific way, beginning with the files all being added to a folder called "Video_TS." As all DVD discs are required to use this specific file and folder structure, most multimedia playback packages for your computer are able to recognize Video_TS folders and decode the MPEG 2 files stored within.

Option 1: GOM Player

Step 1

Download an AC3 audio codec to your computer (see Resources), right-click the file and select "Extract Here."

Step 2

Double-click the setup file and allow the codec to install. This enables your computer to decode the audio component of the DVD files stored in the Video_TS folder.

Step 3

Download and install GOM Player on your computer, using the "Standard Installation" option when prompted (see Resources). This associates all compatible files with GOM Player, making it your computer's default multimedia player.

Step 4

Open the Video_TS folder on your computer and double-click the "VIDEO_TS.IFO" file. GOM Player automatically launches and displays the "Codec Finder" function. Click the "Find Codec" button. A search page opens in your computer's Web browser with a link to the required MPEG 2 video codec.

Step 5

Click the link to download the MPEG 2 video codec, and then double-click the file to install it once download has completed.

Step 6

Click the "VIDEO_TS.IFO" file in the Video_TS folder again. GOM Player automatically launches and playback of the Video_TS file begins.

Option 2: KMPlayer

Step 1
Download and install KMPlayer on your computer and launch it once installation is complete (see Resources).

Step 2

Click the "File" menu and select "Add Folder."

Step 3

Navigate to the Video_TS folder on your computer, select it and click "Open." Playback of the files within the Video_TS folder begins.

Opiton 3: Media Player Classic

Step 1

Download and install Media Player Classic on your computer and launch it once installation completes (see Resources).

Step 2

Click the "File" menu and select "Open."

Step 3
Navigate to the Video_TS folder on your computer.

Step 4

Click the "VIDEO_TS.IFO" file in the Video_TS folder and click "Open." Playback of the files stored within the Video_TS folder begins.

Tips
  • You may not need to install the MPEG 2 and AC3 codecs for a new multimedia playback package if they have previously been installed on your computer by a different multimedia package.
  • Media Player Classic and KMPlayer have the MPEG2 and AC3 codecs built into their software, negating the need to install them separately.
  • You do not need to select each individual file in the Video_TS folder. After clicking the "VIDEO_TS.IFO" file, your multimedia playback software detects the other files stored in the folder and opens them automatically as required during playback.
  • An "Audio_TS" folder is also present on a DVD disc, but isn't typically required for playback on your computer.
However,due to codec issue, you will find that Video TS files are not supported by some media players or mobile devices by default.  To play Video TS Files in Windows/Mac without any crashing issues when watching, a quick workaround is to convert the Video TS to common formats (like AVI, MOV, MPEG, WMV, etc) to fit the local media player with Video Converter Ultimate from Pavtube.

If you are Mac users, you can try Pavtube iMedia Converter for Mac.

Below is easy steps for you, you can convert Video TS files to compatible formats for watching on Win/Mac.

Step 1: Add Video TS video files

Run Pavtube Video Converter Ultimate, and then click "Add Video" add to import the Video TS video files to the converter.


Step 2: Choose output format to fit your media player.

In “Format” drop down list box, you may select best video format for plaing.

For example,

You can choose "WMV HD(*.wmv)" from "HD Video" for Windows Media Player.

And select "MOV - QuickTime(*.mov)" from "Common Video" for QuickTime Player.


Step 3: Start Convert

Click “Convert” in the main interface to start transcoding Video TS videos.

After conversion, you can use converted Video TS files for playback easiliy and smoothly on your media player. Now choose the best method to play Video TS extension video files on PC and Mac!

References

GOM Lab: How Do I Watch DVDs With GOM Media Player?
FileInfo.com: What is the Purpose of the VIDEO_TS Folder On My DVD?

Resources

GOM Lab: What is the Codec Finder
Free-Codecs.com: AC3 Filter 2.5b
Free-Codecs.com: Media Player Classic
GOM Player: Download
Videohelp.com: KMPlayer