Thursday, February 27, 2014

Rip DVD movies to iPad Mini 2, iPad Air, iPad series on Mac for playback

Description: After you got the iPad Mini 2, iPad Air and iPad series, you may have some questions when you want to put DVD movies on iPad series on Mac. Get the easy-to-use DVD Ripper for Mac here.

Apple devices are becoming more and more popular now, with ultrafast wireless that makes browsing, downloading, and streaming content at blazing speed, and iOS7 the latest IOS operating system. However, as saying goes, nothing is perfect, so does iPad Mini 2, iPad Air, iPad series. You may meet the problems when copy/put DVD movies to iPad series on Mac.

Hi, I first want you to know that I am Deaf. I want to look for a program to convert my DVD to an iPad format with subtitles. So how do I embed the subtitles in so I can always see them when playing the movie on my iPad Air? Besides, I am a Mac user.

In fact, you can't play DVD on iPad Mini 2, iPad Air and iPad series directly, you'll need to convert your DVD movies to iPad series friendly video formats first. Below is how and here we provide the Mac solution. 

At first, everything will be easy if you get this excellent Mac DVD to iPad series Converter to do you a favor. Applying this Mac DVD ripping tool, you can easily convert your DVD movies to iPad common videos that supported by iPad Mini 2, iPad Air, iPad series on Mac. Below is the step-by-step guide for you.


Tips:

1. For Windows users, get this DVD to iPad series Converter;

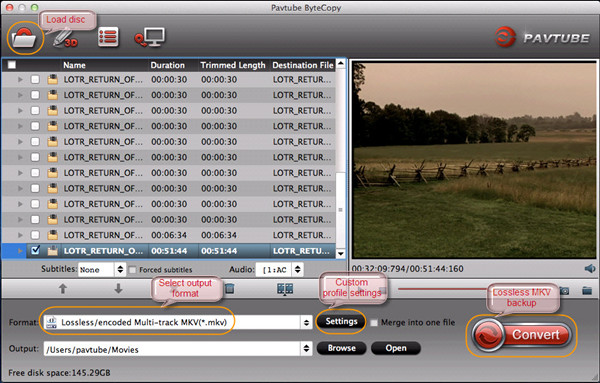
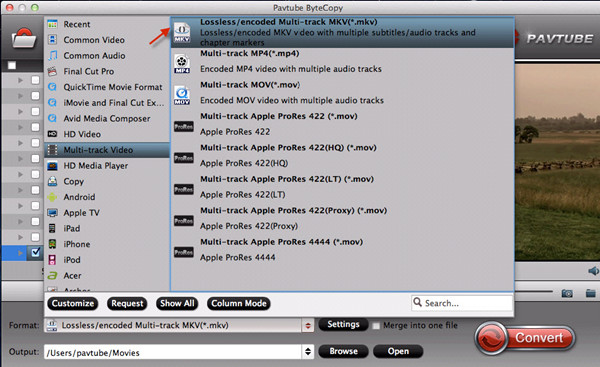
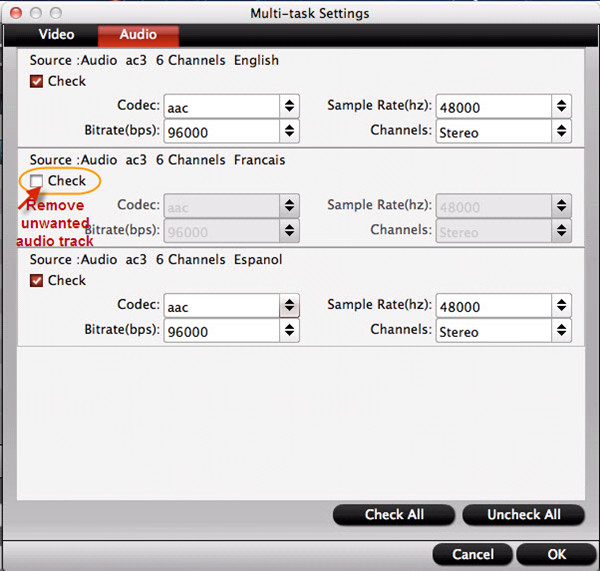
2. If you want to backup your DVD movies with keeping multiple audio tracks and subtitle streams on Mac, try to use Pavtube ByteCopy for Mac.

Tutorials: Rip DVDs to iPad Mini 2, iPad Air, iPad series on Mac for playback

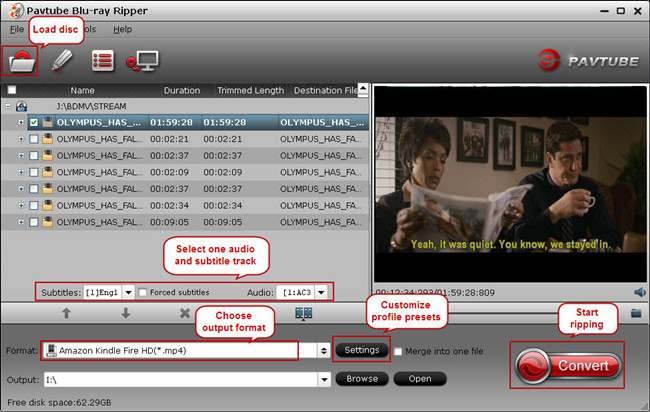
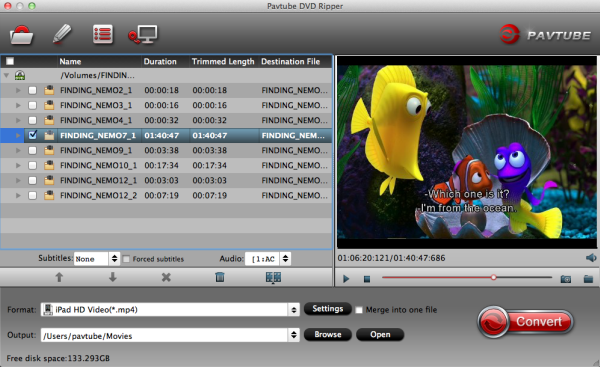
Step 1: Load DVD Disc.

Open Pavtube DVD Ripper for Mac and load your source DVD movie.


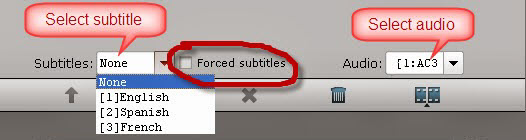
Step 2:  Check forced subtitles for output.

Because DVD always contains multiple subtitle and audio tracks, you can go to choose the desired subtitle and audio on the interface for output. Beside subtitles option, "Forced subtitle" is optional and uncheck by default. Go to check "Forced subtitles" for output. Take note that it will output forced subtitles only if it is checked. 


Step 3: Choose suitable profile.

From the "Format" drop-down list, you are suggested to follow the path " iPad > iPad HD Video(*.mp4)" for ripping DVD to iPad series video.

To convert DVD to iPad Air/iPad Mini 2, just choose the optimize profile for them from iPad option.


Step 4: Adjust profile presets (Optional).

If you like, you could set profile parameters to get better video quality, such as video codec, file size, video bitrate, frame rate, etc.

Step 5: Start ripping DVD to MP4 video on Mac.

Double check above steps and you could click the "Convert" button on program interface to start ripping DVD to MP4 for iPad Mini 2, iPad Air, iPad series with Mac OS X . After it finished, open output file destination, locate the created MP4 video and you could watch it on your iOS devices with embed subtitles.

Read How to transfer video, music, photo from PC/Mac to iPad Air?

Tips:

Pavtube DVD Ripper has powerful edit functions such as trim video for your needed length, crop video to get rid of annoying black edges, join multiple video clips into one, add text/image watermark and add subtitles. For example, if the original DVD movie has no subtitle or the subtitles you need, you can download it from website and then add it into the output videos for full enjoyment with this software. 

More topics:
View Hottest DVD Movies on iPad Air 
Play SD/HD Videos on iPad Air and iPad series
Streaming 2D/3D Blu-ray movies to iPad Mini 2, iPad Air, iPad series
Rip a 3D Blu-ray to 2D Video for Playback by iPad Air or other iPad series
Convert MKV with DTS Audio & Subtitles to iPad Air, iPad Mini 2 and iPad series

Friday, February 21, 2014

Rip children's Blu-ray movie to iPad for use in car or watching on TV over LAN

Looking for a quick way to rip children's movie to iPad for use in car or convert to watching on TV over LAN? Read this article to learn how.
I like watching movies, now I'm looking for a Blu-ray converting program to rip children's movie to iPad for use in car, as well as some movies to watch on TV over LAN. Anythig recommended?

Just rip all your BD/DVDs to your computer or external storage, and you’ve now got a digital library of movies that you can watch at any time from anywhere! If you have any portable device, like iPad or TV, it’s super easy to get your Blu-ray movies for enjoying.

The process is relatively simple, so even if you are not technically savvy, you should be able to backup all of your Blu-ray without an issue and have a format to be used on the iPad/TV.
What You’ll Need- Pavtube Blu-ray Ripper which can remove the disc protection and copy source disc to computer hard drive with same structure preserved. Also rips Blu-ray to friendly format with ease. Test it and works well on all my seven devices: 3 smartmobiles and 4 tablets.

Full guide: Make 1:1 Copy Blu-ray movie with Pavtube Blu-ray Ripper


Step 1. Install the Blu-ray Backup Tool on your PC.

Pavtube Blu-ray Ripper/Blu-ray Ripper for Mac is an excellent Blu-ray backing up tool that can make 1:1 copy of your source BD/DVD with original structure including extras and menus. Meanwhile, this app is regarded as a great Blu-ray ripping program and Video Converter to help users convert Blu-ray collections and various videos for new how tablets and smartphones including iPad mini, iPad Air, iPhone 5S, Samsung Galaxy Tab, Kindle Fire HDX 7, Google Nexus 7/10, Media Players and TV.

Step 2. Launch the best BD backup tool, and load your Blu-ray movie from disc drive to the app.

Step 3. Click the “Browse” button to set output folder where you want to save the copied Blu-ray and DVD movies.


Step 4. Hit the Copy the entire disc icon on Video Converter Ultimate main interface and start Blu-ray backing up process.


Tips:

1. If you’d like to copy only movie content and leave out the extras and commentary, the Directly Copy is exactly what you need, which copies intact .M2TS/VOB main movie from original BD/DVD disc without extras.


2. There are various output profile presets.

Many people like me own would love to enjoy movies and TV shows from physical discs to more than one mobile phone and tablet. You can count on Pavtube Blu-ray Ripper because it offers so many output formats that you would find the suitable one eventually.

The general format is "H.264 Video(*.mp4)" from "Common Video" option. For watching on TV, you can choose this format.


You can also choose iPad2 and New iPad format: "iPad Video H.264(*.mp4)" from "iPad" option.

3. Video Editor available in this converter.

Another reason I like Pavtube is it ships with many video editing features, and usually I use it to cut off black bars of original Blu-rays and play full screen on my HD TV at home. Besides, it does more than that. It trims off unwanted commercials from TiVo recordings, add watermarks as copyright protection to your source file, and more.


4. Other small but essential functions.

Pavtube application takes advantage of the NVIDIA CUDA technology and AMD APP technology, and the conversion speed can be increased up to 6 times faster than ever before. Moreover, Pavtube programs support adding *.srt and *.ass subtitles into video and merge into one file for output.

Now you can freely transfer your backed up Blu-rays to iPad for use in car and watching on TV over LAN.

More related:

Extract audio from recorded TV programs to play on MP3 player
Which Online Video Converter is right for you?
Backup Blu-ray disc to 1080p HD MP4, M4V and MOV for Mac Playback

Thursday, February 20, 2014

Buy a Disney 1080p movie on Blu-ray, Watch It on Your Android Tablet/Phone

Can owners of the Disney Blu-ray disc will be able to transfer the 1080p Blu-ray movie to Android devices for viewing on the go? Get this top Blu-ray Ripper which enables you transfer Blu-ray movie on Android Tablet/Phone.
With more and more Disney 1080p Blu-ray movies being released, do you have the intend to watch Blu-ray movies on Android tablets anytime anywhere with the big screen. However, since Android devices don’t have the drive for Blu-ray playback, in order to get Blu-ray movies playable on Android tablets or phones, you need to rip Blu-ray to Android supported video formats like MP4 first before transferring them to your device.


Searched widely and I got some tech support for converting Blu-ray to Android MP4 video without losing quality in a simplest way, I find more than one people suggest to rip Blu-ray to Android Phone & Tablet with Pavtube Blu-ray Ripper.

 It is an ideal app for you to rip Blu-ray, DVD, ISO/IFO files to MP4 video. Plus, it also can help you to convert Blu-ray, DVD to almost any other common video format such as VOB, FLV, WMV, AVI, MKV or backup the BD, DVD keeping the whole movie structure as you need.

With it, you can enjoy 2D/3D Blu-ray/DVD on Android devices like:

Kindle Fire HD
Galaxy Tab 3
Google Nexus 7/10
Asus Transformer Prime
Samsung Galaxy Tab tablets
Nook Tablet

Now just download it and follow the tutorial below.

Rip Blu-ray to 720p mp4 video Android Phone & Tablet for watching 

1. Click the top left icon to import Blu-ray/DVD discs correspondingly.


Click the drop-down list on the bottom; choose proper presets according to your device model. You can see columns for normal Android devices, tablets/phones from HTC, Samsung, Motorola or PSP/PS3.

Basically the “Android Tablet 720P Video(*.mp4) or "Android Tablet 1080P Video(*.mp4)"” is a universal format for Android tablets and smartphones. 720p can fit for most android device and it is recommended to you.

Or depends on your device, you can choose a suitable video format from “Android” catalogue, or you can use the small search box to locate your device quickly.


2. Check the pencil-like icon to activate the editing function. Here you can trim video for your needed length, crop video to get rid of annoying black edges, join multiple video clips into one, add text/image watermark and add subtitles. For example, if the original Blu-ray movie has no subtitle or the subtitles you need, you can download it from website and then add it into the output videos for full enjoyment with this software.

Notice the small triangles under the progress bar? Click them to adjust frame by frame easily.

3. If you want to output video in specific size, bitrate or frame rate, click “Settings” and change the digits as you need. Pls notes that the video quality improved with the bitrate, but not the higher the better. You need to consider your device configuration as the high bitrate required higher read&write speed.

4. Ok now click the “Convert” button to start converting/copying Blu-ray to Andorid tablet ot phone for playing. After conversion, click “Open” to locate the converted video directly.

Don’t know how to transfer videos from PC to Android? You can view this Android File Transfer.

How to transfer videos from PC to Android Phone/Tablet?
How to transfer videos from Mac to Android Phone/Tablet?

The Mac version is Pavtube Blu-ray Ripper for Mac. Both the Windows version and Mac version are 20% OFF to thank you for the great support.

More tips:


How to Rip DVD to QuickTime MOV for playback on Mac Mavericks

Description: This guide reveals how to convert  DVD video files to QuickTime MOV for playback smoothly on Mac Mavericks.

QuickTime is an extensible proprietary multimedia framework developed by Apple Inc., capable of handling various formats of digital video, picture, sound, panoramic images, and interactivity . If you've got some awesome DVDs and want to backup them to Mac, then import to QuickTime player for enjoying.


However, currently QuickTime Player does not support DVD file. And in that case, you need a Mac dvd to QuickTime Converter to transcode DVD to a format that QuickTime can recognize. MOV is the default video format QuickTime media player supports. To convert DVD to QuickTime MOV on Mac Mavericks successfully and quickly, an easy-to-use yet efficient tool- Pavtube DVD Ripper for Mac is highly recommended.

It provides super-fast converting speed and high quality output video. Furthermore, it has optimized preset for QuickTime, which can save your much worry.

To transcode DVD discs to MOV/MP4/Apple Prores with multiple audio and subtitle tracks, that is what Pavtube ByteCoy for Mac can do for you. Suppose you are good at both English and Francia, and want to preserve both of them from original DVD discs when converting. Then you can select the audio you want when enjoying movies.

This guide will show you how to convert DVD movies to QuickTime mov for playing with QuickTime on Mac Mavericks with Pavtube DVD Ripper for Mac.

Step 1. Add videos into this Mac DVD to QuickTime Converter

After running this DVD to QuickTime mov Converter for Mac, just click either "Add Video" button or "Add from folder" button to load source .DVD files.


Step 2. Choose the output format and set the destination

Choose configured preseDVD for QuickTime Player. In order to convert DVD files to MOV for using in QuickTime, simply hit "Format" menu and follow "Common Video"> "MOV-QuickTime (*.mov)".


Tips:

a. You can click “settings” to adjust the output parameters, such as resolution and bitrate.

b. Edit function is very easy to use, you can trim, crop, add watermark or adjust effect.

Step 3. Start convert

Hit the "Convert" button to kick off to DVD to QuickTime MOV conversion on Mac Mavericks.

After conversion, you can use converted files for natively watching DVD video clips with QuickTime Player on Mac freely or sharing with your friends and family.

Get more solutions with DVD video file:

How to rip DVD to edit in FCP, FCP X, FCE on Mac?
Import Blu-ray contents to iMovie/Final Cut Express for editing
How to transfer FLV files to iMovie for editing?
Convert Blu-ray to Final Cut Pro, Blu-ray to ProRes 422

Tuesday, February 18, 2014

Rip Blu-ray to Lossless mkv format with freely changing to your desired language

If you are wondering how to rip Blu-ray to SD MKV format with all subtitles and audio tracks keeping, this article shows you exactly how to make it work.

My problems are I can't seem to create a mkv of the full blu ray (BD) with all the sound tracks. Each time I do it I only get one audio sound track. One time Japanese. I would like to choose English French and Spanish. Sound tracks and subtitles. I also see a problem when down converting the BD from HD to SD. Again I can't seem to control the audio sound tracks that get copied. Is there a way to go from blu ray direct to SD MKV multi track?


To transfer Blu-ray for playing with multi-track format, the first step is to remove commercial Blu-ray discs and DVDs protection from film studio, and then do the conversion. To help him to solve the problem, I tested some softwares and did comparison.

Here we recommended this Pavtube ByteCopy for Mac which does a great job in quick decrypting the protected discs within a few clicks. Best of all, it can handle the latest Blu-ray and is capable of backup Blu-ray to lossless MKV preserving all the multiple audio and subtitle tracks as well as chapter markers on Mac. Also, I can convert my Blu-ray/DVD movie to any format playable or editable with it. In this way, I can freely change subtitles to get your desired language. The Windows version is Pavtube ByteCopy.
  • Both are 50% off now. (Last Day only!)
More money-saving Trip:

ByteCopy($42) + Blu-ray Video Converter Ultimate($65)
= Only $80, Save $27
ByteCopy for Mac($42) + iMedia Converter for Mac($65) = Only $80, Save $27
ByteCopy($42) + Video Converter($35) = Only $60, Save $17
ByteCopy($42) + DVD Creator($35) = Only $60, Save $17
ByteCopy($42) + MXF MultiMixer($45) = Only $70, Save $17

Download the right version and follow the steps below to rip Blu-ray to lossless MKV format on Mac.

Note: A Blu-ray drive is needed before ripping.

Step 1. Load Blu-ray movie.

Get ready to insert your Blu-ray disc to disc drive, click this "Load Disc" button to browser to disc drive and import the disc. Or you could load BD folder and BD ISO from computer hard drive to this best Blu-ray to MKV Converter for Mac.


Step 2. Choose suitable output format.

Pavtubr ByteCopy for Mac offers an special category for users who would like to keep multiple audio tracks and subtitles in saved Lossless MKV file.

To pass-through original TrueHD/Dolby Digital/DTS/PCM audio, just select Multi-track Video > Lossless/encoded Multi-track MKV(*.MKV) for output. In this way the original audio tracks are streamed without transcoding from source BD Disc to saved MKV file.


Step 3. Adjust profile presets (Optional).

You are allowed to customize profile presets as you like, you could remove unwanted audio track in Audio tab under Settings menu, and uncheck subtitles you do not need in Subtitles tab.


Step 4. Start ripping Blu-ray disc on Mac.

Save all your settings, and back to ByteCopy for Mac main interface, hit the "Convert" button to start converting. When the lossless backup completes, you would get a single large MKV file saved in output file destination.

Tips: If you have 3D Blu-ray discs, and want to get them playable, you can choose "MKV Top-Bottom 3D Video (*.mkv)", or "MKV Anaglyph 3D Video (*.mkv)" or "MKV Side-by-Side 3D Video (*.mkv)" which can retain the 3D effect.

Read more:

Play multi-channel MP4 file on iOS devicesConvert Blu-ray ISO to MKV from Mac HDDUse XBMC for Blu-ray Playback on MacBlu-ray playback on Mac VLC player with wanted audio and subtitles